感谢小郭软件提供的离线地图下载工具,这个失效了,文章末尾会附上下载链接,使用方式参见链接
一、下载离线地图相关文件
确保文件夹baiduLX_JS-master\bmap-offline\下的tiles、tiles_hybird、tiles_satellite中是空的,我们需要下载我们自己的地图文件
如何下载地图?
(1) 双击运行BMapTool程序,
(2) 切换导航到“下载地图”
(3) 点击区域下载,在地图上画个框后,弹出窗口中选择瓦片级数
(4) 选择目录并点击确认后,打开下载工具
(5) 在下载工具中点击“开始下载”。
最后得到的离线文件结构如图
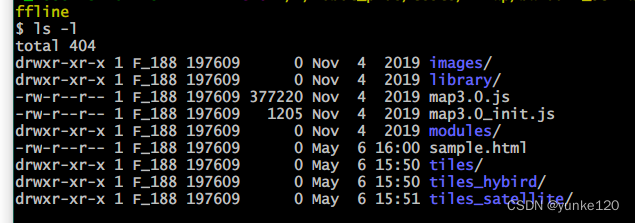
其中得images、libbrary、modules不需要改动,map3.0.js和map3.0_init.js是你的网页文件index.html需要引用的,也不要改动,除非你要修改离线地图瓦片的保存位置,需要修改map3.0_init.js文件,tiles、tiles_hybird、tiles_satellite是我们下载的地图瓦片文件,sample.html是作者提供给我们的示例文件,可以修改为我们的index.html
二、在QT中创建示例工程
QT5.13.0 + VS2017
参考此文章,记录了在QT中加载百度在线地图的示例,离线工程基本与在线是一样的,不同的只在index.html之中
‘widget.h’
1
2
3
4
5
6
7
8
9
10
11
12
13
14
15
16
17
18
19
20
21
22
23
24
25
26
27
28
29
30
31
32
33
34
| #ifndef WIDGET_H
#define WIDGET_H
#include <QWidget>
#include <QWebEngineHistory>
#include <QWebEngineHistoryItem>
#include <QWebEnginePage>
#include <QWebEngineView>
#include <QtWebEngineWidgets/QtWebEngineWidgets>
namespace Ui {
class Widget;
}
class Widget : public QWidget
{
Q_OBJECT
public:
explicit Widget(QWidget *parent = nullptr);
~Widget();
private slots:
void on_pushButton_2_clicked();
signals:
private:
Ui::Widget *ui;
};
#endif
|
‘widget.cpp’
1
2
3
4
5
6
7
8
9
10
11
12
13
14
15
16
17
18
19
20
21
22
23
24
25
26
27
28
29
30
31
32
33
34
35
36
37
38
39
40
41
| #include "widget.h"
#include "ui_widget.h"
#include <QStringLiteral>
Widget::Widget(QWidget *parent) :
QWidget(parent),
ui(new Ui::Widget)
{
ui->setupUi(this);
QString htmlPath = QCoreApplication::applicationDirPath() + "/html/";
QString htmlFile = htmlPath + "index.html";
qDebug() << htmlFile;
QFile file(htmlFile);
if(!file.exists())
qDebug() << "html file is not exist";
QWebChannel *webChannel = new QWebChannel(ui->widget->page());
ui->widget->page()->setWebChannel(webChannel);
webChannel->registerObject(QString("JSInterface"), ui->widget);
ui->widget->page()->load(QUrl("file:///" + htmlFile));
}
Widget::~Widget()
{
delete ui;
}
void Widget::on_pushButton_2_clicked()
{
QString str = ui->lineEdit->text();
QString lon1 = str.split(",")[0];
QString lat1 = str.split(",")[1];
QString lon2 = str.split(",")[2];
QString lat2 = str.split(",")[3];
QString cmd=QString("drawLine(%1,%2,%3,%4)").arg(lon1).arg(lat1).arg(lon2).arg(lat2);
ui->widget->page()->runJavaScript(cmd);
}
|
‘widget.ui’
1
2
3
4
5
6
7
8
9
10
11
12
13
14
15
16
17
18
19
20
21
22
23
24
25
26
27
28
29
30
31
32
33
34
35
36
37
38
39
40
41
42
43
44
45
46
47
48
49
50
51
52
53
54
55
56
57
58
59
60
61
62
63
64
65
| <?xml version="1.0" encoding="UTF-8"?>
<ui version="4.0">
<class>Widget</class>
<widget class="QWidget" name="Widget">
<property name="geometry">
<rect>
<x>0</x>
<y>0</y>
<width>823</width>
<height>480</height>
</rect>
</property>
<property name="windowTitle">
<string>Widget</string>
</property>
<layout class="QGridLayout" name="gridLayout">
<item row="0" column="0">
<layout class="QHBoxLayout" name="horizontalLayout_2" stretch="1">
<item>
<widget class="QGroupBox" name="groupBox">
<property name="title">
<string>GroupBox</string>
</property>
<layout class="QGridLayout" name="gridLayout_2">
<item row="0" column="0">
<layout class="QVBoxLayout" name="verticalLayout_2" stretch="10,1">
<item>
<widget class="QWebEngineView" name="widget" native="true"/>
</item>
<item>
<layout class="QHBoxLayout" name="horizontalLayout_3">
<item>
<widget class="QLineEdit" name="lineEdit"/>
</item>
<item>
<widget class="QPushButton" name="pushButton_2">
<property name="text">
<string>设置标点</string>
</property>
</widget>
</item>
</layout>
</item>
</layout>
</item>
</layout>
</widget>
</item>
</layout>
</item>
</layout>
</widget>
<layoutdefault spacing="6" margin="11"/>
<customwidgets>
<customwidget>
<class>QWebEngineView</class>
<extends>QWidget</extends>
<header location="global">qwebengineview.h</header>
<container>1</container>
</customwidget>
</customwidgets>
<resources/>
<connections/>
</ui>
|
3、创建index.html
1
2
3
4
5
6
7
8
9
10
11
12
13
14
15
16
17
18
19
20
21
22
23
24
25
26
27
28
29
30
31
32
33
34
35
36
37
38
39
40
41
42
43
44
45
46
47
48
49
50
51
52
53
54
55
56
57
58
59
60
61
62
63
64
65
66
67
68
69
70
71
72
73
74
75
| <!DOCTYPE html>
<html>
<head>
<meta http-equiv="Content-Type" content="text/html; charset=utf-8" />
<meta name="viewport" content="initial-scale=1.0, user-scalable=no" />
<style type="text/css">
body,
html,
#allmap {
width: 100%;
height: 100%;
overflow: hidden;
margin: 0;
font-family: "微软雅黑";
}
</style>
<script type="text/javascript" src="./map3.0_init.js"></script>
<script type="text/javascript" src="./map3.0.js"></script>
<script type="text/javascript" src="./qwebchannel.js"></script>
<title>地图展示</title>
</head>
<body>
<div id="allmap"></div>
</body>
</html>
<script type="text/javascript">
var map = new BMap.Map("allmap");
map.centerAndZoom(new BMap.Point(113.557892, 34.8333), 15);
map.addControl(new BMap.MapTypeControl({
mapTypes:[
BMAP_NORMAL_MAP,
BMAP_SATELLITE_MAP,
BMAP_HYBRID_MAP
]}));
map.enableScrollWheelZoom(true);
var point = new BMap.Point(113.557892,34.8333);
var marker = new BMap.Marker(point);
map.addOverlay(marker);
new QWebChannel(qt.webChannelTransport,
function (channel) {
window.JSInterface = channel.objects.JSInterface;
}
);
function myMarker(lng, lat) {
allMarker = map.getOverlays();
var newpoint = new BMap.Point(lng, lat);
var newmarker = new BMap.Marker(newpoint);
map.addOverlay(newmarker);
};
function drawLine(lng1,lat1,lng2,lat2) {
var line = new BMap.Polyline([
new BMap.Point(lng1, lat1),
new BMap.Point(lng2, lat2)
], {strokeColor:"red", strokeWeight:2, strokeOpacity:1});
map.addOverlay(line);
}
</script>
|
在第19,20,21行引用了外部js文件和qt与js交互文件
1
2
3
| <script type="text/javascript" src="./map3.0_init.js"></script>
<script type="text/javascript" src="./map3.0.js"></script>
<script type="text/javascript" src="./qwebchannel.js"></script> <!-- 与qt交互 -->
|
其它与上一篇文章基本一样
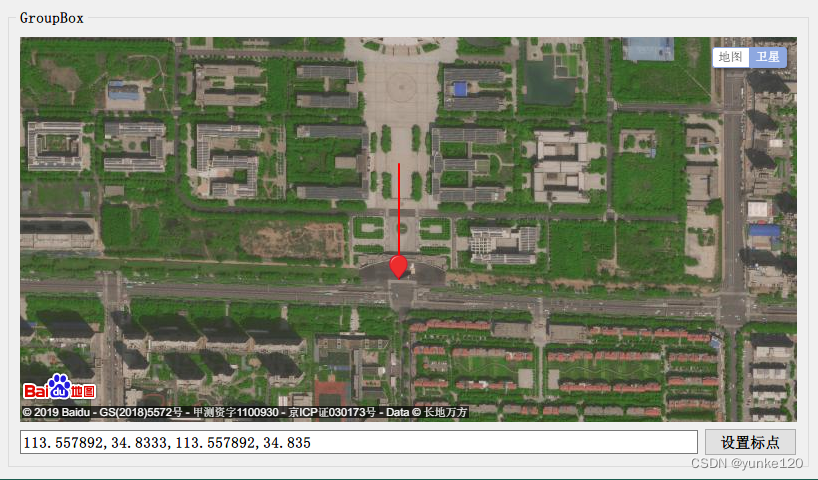
四、结果
五、参考
小郭软件
Carlos·Wei
百度地图瓦片离线下载工具
示例demo