一般步骤
- 在百度地图开发者网站中获取密钥
- 在QT中创建示例工程
- 创建网页
index.html - 运行
- 参考
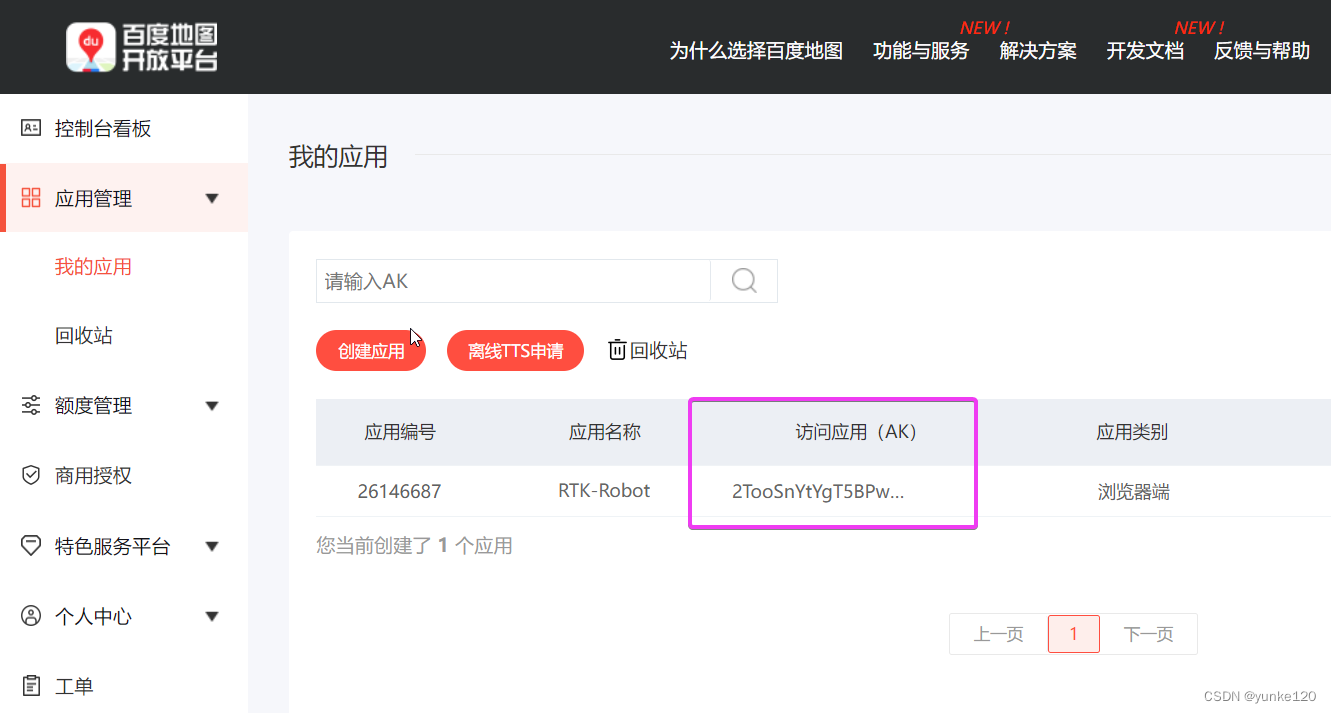
一、在百度地图开发者网站中获取密钥
选择Javascript API

完成以下三步

在控制台->我的应用里便可以查看自己应用的Key
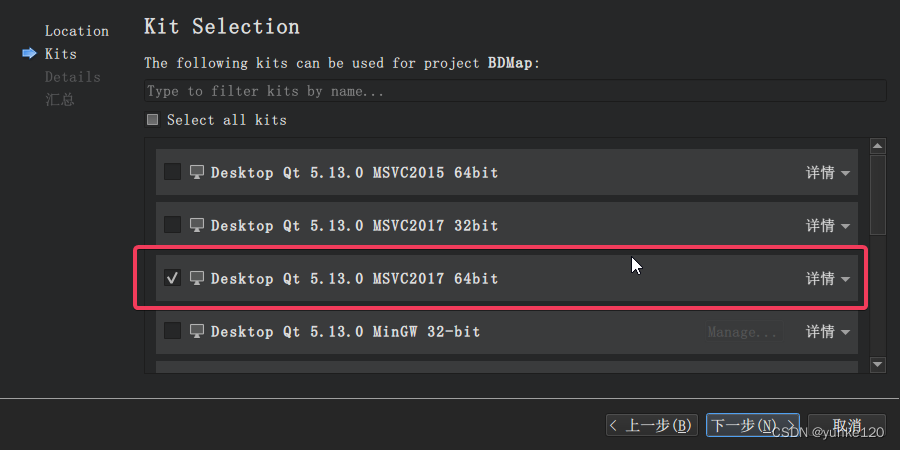
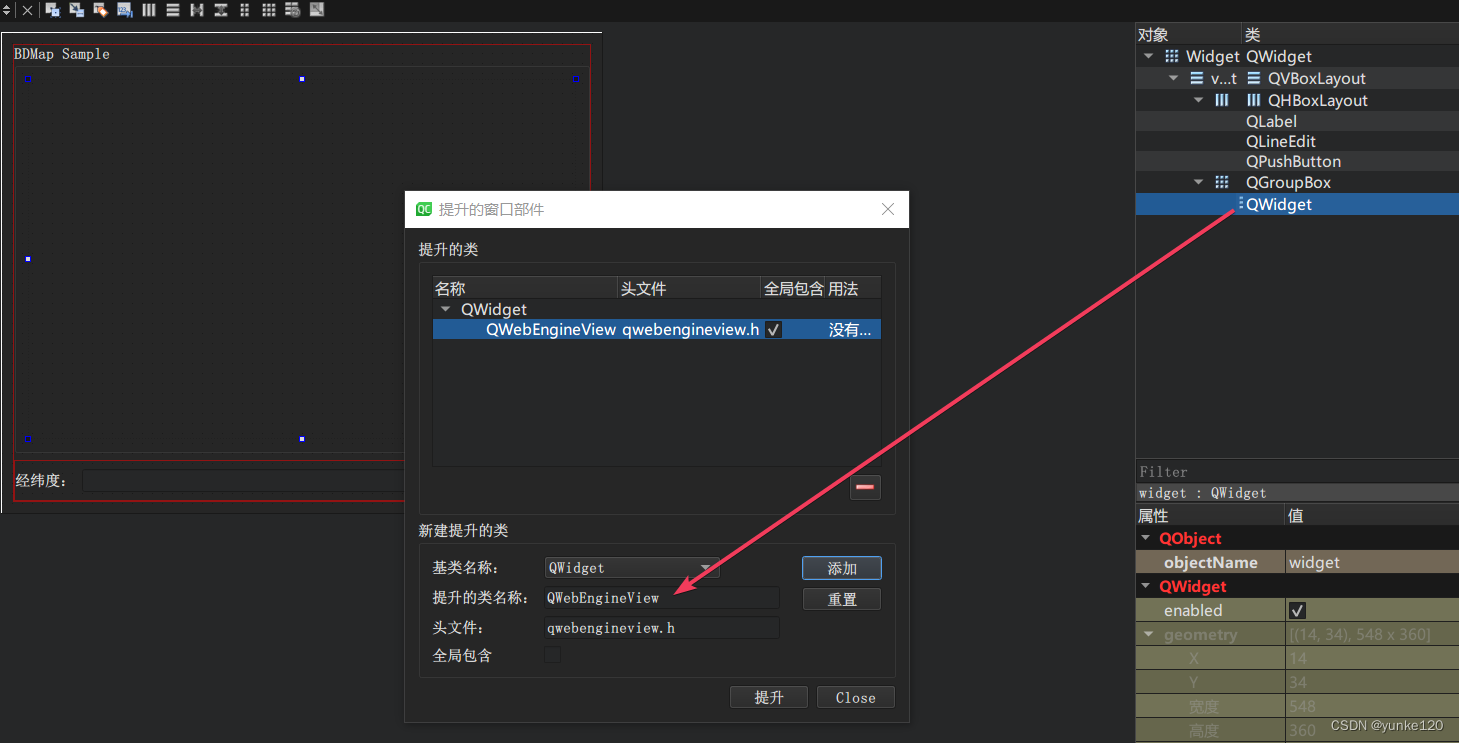
二、在QT中创建示例工程
需要注意的点是,
- 必须选择
MSVC编译
- 在
pro文件中添加 - 将
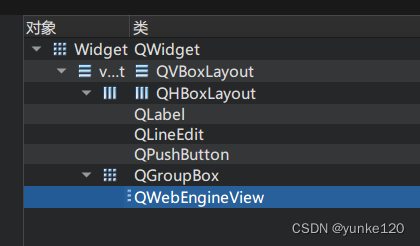
Widget控件提升为QWebEngineView
在路径`G:\QT\Qt_data\Examples\Qt-5.13.0\webchannel\shared`下拷贝`qwebchannel.js`文件备用,此文件是QT程序与JS文件通讯用的
`Widget.h` 代码
1
2
3
4
5
6
7
8
9
10
11
12
13
14
15
16
17
18
19
20
21
22
23
24
25
26
27
28
29
30
31
| #ifndef WIDGET_H
#define WIDGET_H
#include <QWidget>
#include <QWebEngineHistory>
#include <QWebEngineHistoryItem>
#include <QWebEnginePage>
#include <QWebEngineView>
#include <QtWebEngineWidgets/QtWebEngineWidgets>
namespace Ui {
class Widget;
}
class Widget : public QWidget
{
Q_OBJECT
public:
explicit Widget(QWidget *parent = nullptr);
~Widget();
private slots:
void on_pushButton_clicked();
private:
Ui::Widget *ui;
};
#endif
|
`Widget.cpp` 代码
1
2
3
4
5
6
7
8
9
10
11
12
13
14
15
16
17
18
19
20
21
22
23
24
25
26
27
28
29
30
31
32
33
34
35
36
37
38
39
40
41
| #include "widget.h"
#include "ui_widget.h"
#include <QDebug>
#include <QFile>
Widget::Widget(QWidget *parent) :
QWidget(parent),
ui(new Ui::Widget)
{
ui->setupUi(this);
QString htmlPath = QCoreApplication::applicationDirPath() + "/html/";
QString htmlFile = htmlPath + "index.html";
qDebug() << htmlFile;
QFile file(htmlFile);
if(!file.exists())
qDebug() << "html file is not exist";
QWebChannel *webChannel = new QWebChannel(ui->widget->page());
ui->widget->page()->setWebChannel(webChannel);
webChannel->registerObject(QString("JSInterface"), ui->widget);
ui->widget->page()->load(QUrl("file:///" + htmlFile));
}
Widget::~Widget()
{
delete ui;
}
void Widget::on_pushButton_clicked()
{
QString str = ui->lineEdit->text();
QString lon = str.split(",")[0];
QString lat = str.split(",")[1];
QString cmd=QString("myMarker(%1,%2)").arg(lon).arg(lat);
qDebug() << cmd;
ui->widget->page()->runJavaScript(cmd);
}
|
三、创建网页index.html
网页 `demo`参考百度的[帮助文档](https://lbsyun.baidu.com/jsdemo.htm#aCreateMap)
`index.html`
1
2
3
4
5
6
7
8
9
10
11
12
13
14
15
16
17
18
19
20
21
22
23
24
25
26
27
28
29
30
31
32
33
34
35
36
37
38
39
40
41
42
43
44
45
46
47
48
49
50
51
52
53
54
55
56
| <!DOCTYPE html>
<html>
<head>
<meta name="viewport" content="initial-scale=1.0, user-scalable=no" />
<meta http-equiv="Content-Type" content="text/html; charset=utf-8" />
<title>BDMap Sample</title>
<style type="text/css">
html{height:100%}
body{height:100%;margin:0px;padding:0px}
#container{height:100%}
</style>
<script type="text/javascript" src="https://api.map.baidu.com/api?v=1.0&type=webgl&ak=2TooSnYtYgT5BPwXuND1G6gmHkYCA3mZ"></script>
<script type="text/javascript" src="qwebchannel.js"></script>
</head>
<body>
<div id="container"></div>
<script type="text/javascript">
var map = new BMapGL.Map("container");
var point = new BMapGL.Point(113.557892,34.8333);
map.centerAndZoom(point, 15);
map.enableScrollWheelZoom(true);
var point = new BMapGL.Point(113.557892, 34.8333);
var marker = new BMapGL.Marker(point);
map.addOverlay(marker);
var opts = {
width: 250,
height: 100,
title: "New Marker"
}
var infoWindow = new BMapGL.InfoWindow("Marker", opts);
marker.addEventListener("click", function(){
map.openInfoWindow(infoWindow, map.getCenter());
});
new QWebChannel(qt.webChannelTransport,
function(channel){
window.JSInterface = channel.objects.JSInterface;
}
);
function addMarker(lng,lat){
var newpoint=new BMapGL.Point(lng,lat);
var newmarker = new BMapGL.Marker(newpoint);
map.addOverlay(newmarker);
alert('ok');
};
</script>
</body>
</html>
|
注意第43行中的JSInterface要和QT中定义的ID一样
四、运行
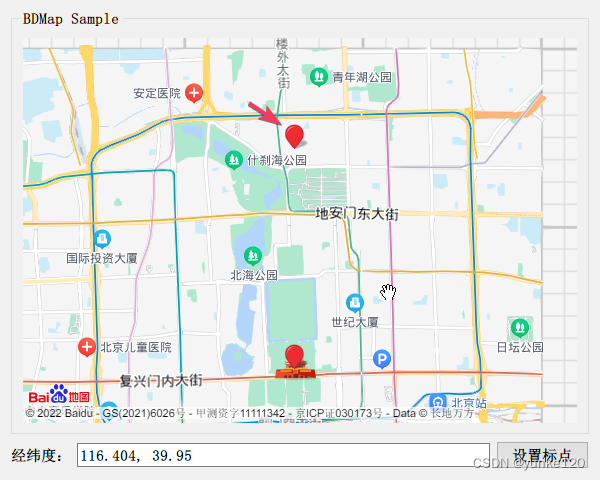
运行结果
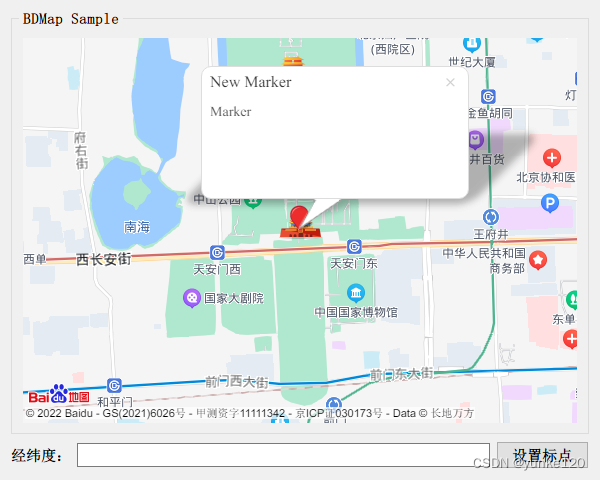
添加标点
五、参考
- 百度地图API SDK
- 地图JS API示例
- 百度地图JSAPI 2.0类参考
- Unite One
- Uncaught ReferenceError: qt is not defined
代码比较简单,云盘 链接:https://pan.baidu.com/s/1e-WzwtVv-aR4kBn-IcAtmg\?pwd=zvb2
提取码:zvb2